
Skill Level: Advanced
Suggested Gauge: 6sts x 9rows = 1 inch
Materials: Yarn 1 (Y1) Undyed DK weight yarn, Yarn 2 (Y2) Self Striping DK weight yarn, Yarn 3 (Y3) Black yarn, 1 set Size #2 Double Pointed (DP) needles, 1 12-inch Size #2 Addi Turbo Needle, 2 skein black DMC floss or 4-6 yards of black sport weight yarn or string, Polyester Fiber-fill,
*Note - I used larger yarn and needles in my sample so that the pictures would be clearer*
Stitch Instructions & Abbreviations
rem: remain(s), remaining
k:knit
p:purl
st(s): stitch(es)
yfwd: Bring working yarn in front
unwkd: unworked
Consolidation: Divide stitches evenly onto two needles. While holding them horizontal and parallel to each other, insert a third needle knit-wise into the first stitch on your front needle then insert the needle knit-wise into the first stitch on the back needle. k2tog.
Turkish Cast on: Tie a slip-knot in the yarn, hold DPN horizontally with the circular needle below it. Place the slip-knot onto both needles & tighten with working yarn hanging down. Wrap yarn counterclockwise towards the right until you have half the number of wraps as CO sts (pattern says “CO 32”, you should have 16 wraps.) yfwd between the two needles. Slide circular needle towards the right, positioning the nylon cable in the bottom half of loops with the tips dangling. Insert a third needle purl-wise into the first loop & purl a stitch & slide it off the left needle as you would do with regular sts. Repeat this step for the appropriate number of loops on the left needle. You now have the proper number of stitches. Half on 1 needle and half on the other.
Introduction You'll begin this critter by making the legs & placing them on a needle for later. Then you will begin the head & work from the top down attaching the legs at intervals. Once the body is complete you will make the eyes, which will utilize some color work, & attach them. If you prefer to embroider the eyes, then make them using Y1 and Y2 only and embroider afterwards. The final step will be to embroider on his facial features & you are free to embellish him as you wish. You may want to work through the Turkish Cast On instructions a couple times, don’t be surprised if you have to start over a few times, it takes some getting used to. But it will be worth it. Enjoy.
Instructions: Arms (Make 2): *With Y1 CO 8 sts, divide onto 3 or 4 needles. Begin knitting in the round by working from the first st you casted on.
Rounds 1-4: k32.
Thumb: KFB in next 2 sts, slip next 6 sts onto a scrap piece of yarn for later, Work an icord for 12 sts.

*The next step doubles your stitches. KFB in each st until you have 8 sts & then knit all sts once. KFB in each st again until you have 16 sts & then knit all sts once again. Cut yarn leaving a 6-inch tail. Using a tapestry needle, slip each st onto the tail. Pull tight and thread it through all sts again, pulling tight to be sure to close the hole. Rather than tying off, thread it down through the bulb, down through the shaft & out the other end and tie it to Y1 to begin working the other fingers.* Round 7: place the rem 6 sts back onto your needles and KFB in each st until you have 12 sts

Rounds 8-10: knit all sts. Now you are ready to start the fingers. You will work the fingers in a similar way to the thumb. Finger #1: Using the next 4 sts & placing the rem sts onto scrap yarn, work an I-cord for 16 sts. Repeat from * to *. Finger #2: Using the next 4 sts & placing the rem sts onto scrap yarn, work an I-cord for 24 sts & repeat from * to *. Finger #3: using the rem 4 sts, work an Icord for 16 sts, repeat from * to *, tie off yarn upon completion. Now is a good time to close up any gaps between fingers & to make sure the yarn tails are all secured into place.
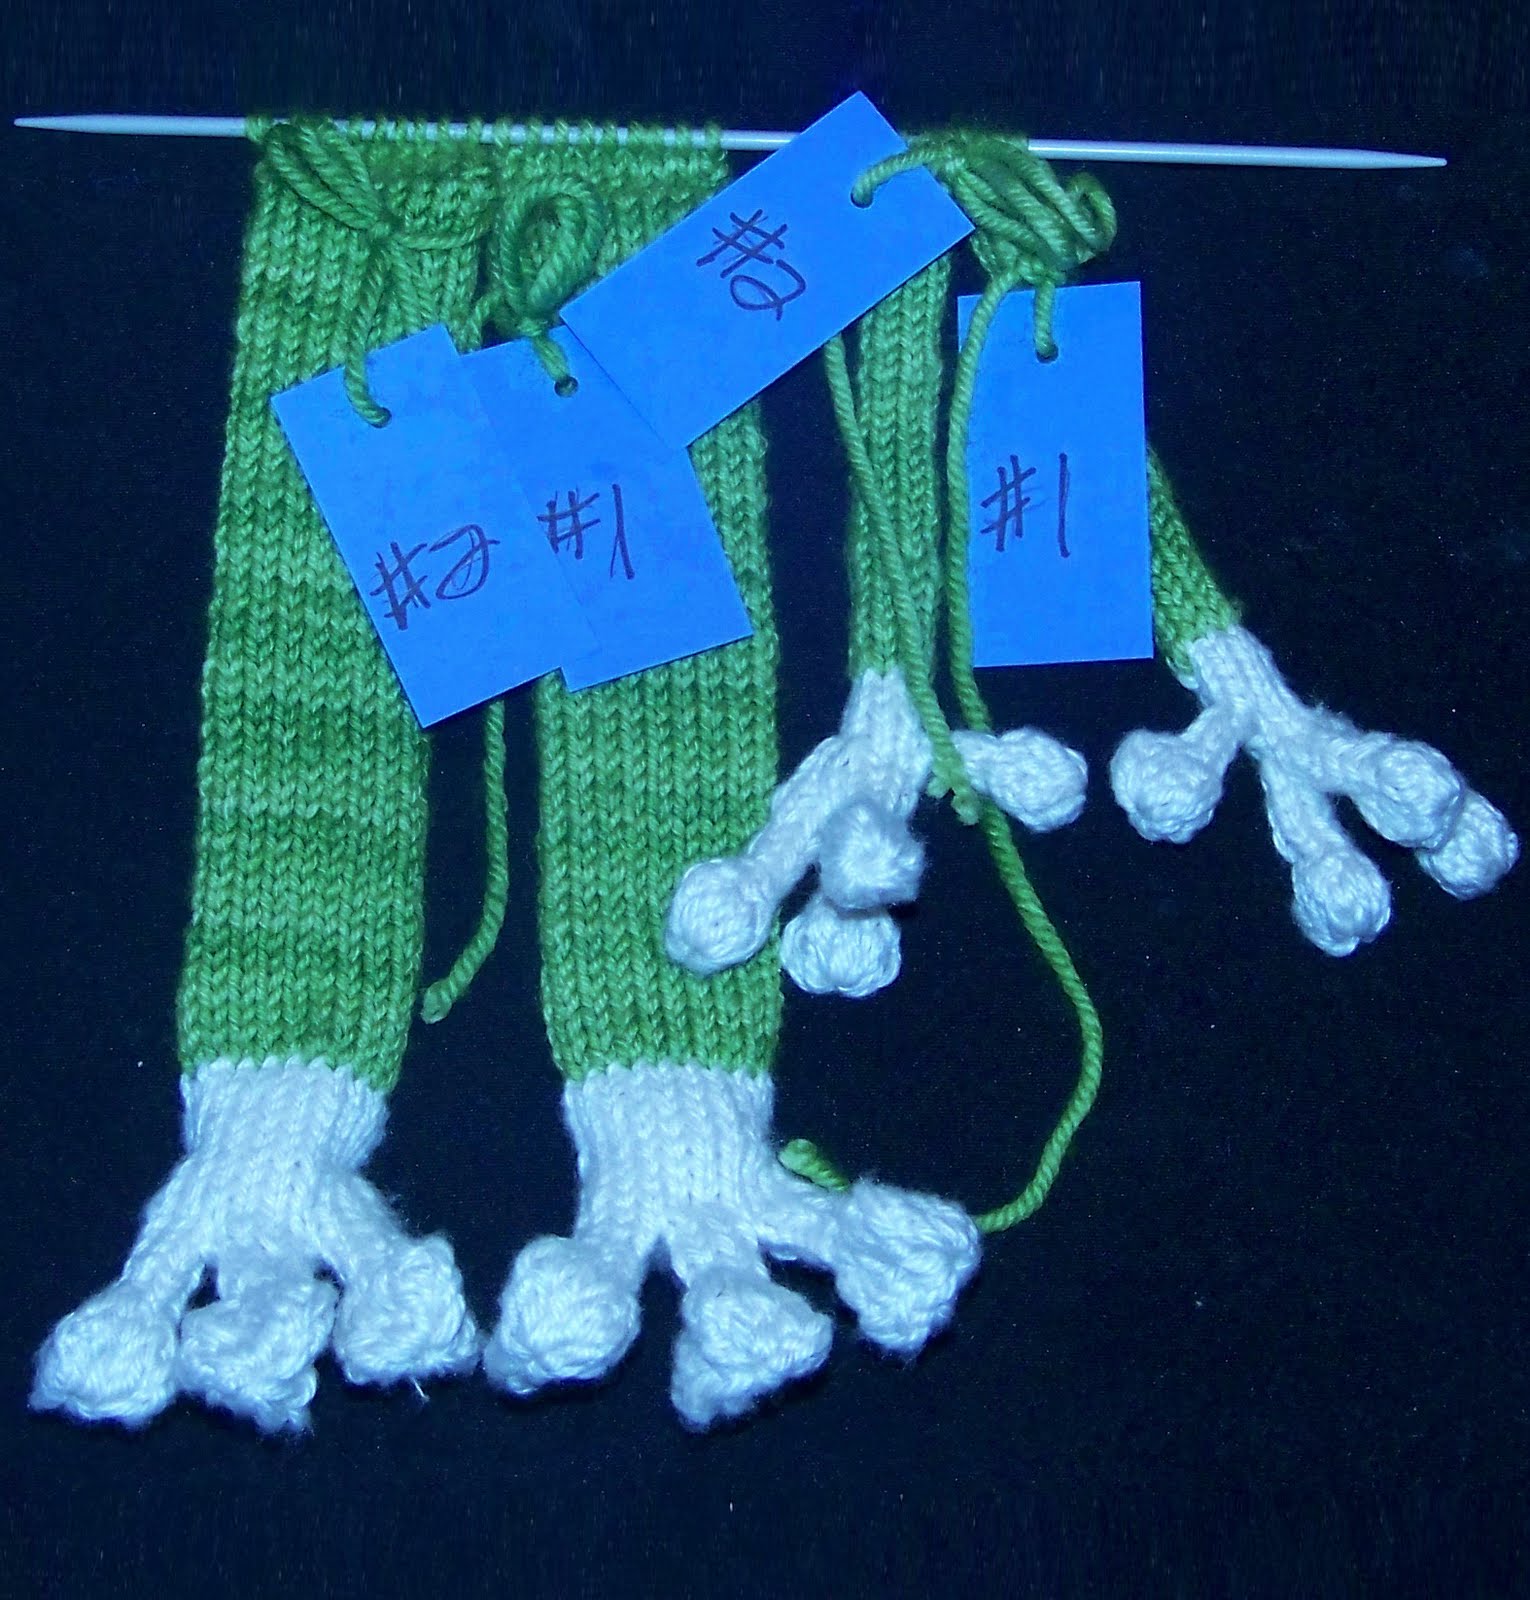
Turn your work around so you that you  are looking at the cast on edge. Tie the new working yarn Y2 to the tail left from the cast on. Using the outside loop of each cast on stitch, pick up 8 sts around the edge.Rounds 1-30: k240 (I like to count by hundreds). Close the arms by consoditating sts. You should now have 4 sts on one needle.
 are looking at the cast on edge. Tie the new working yarn Y2 to the tail left from the cast on. Using the outside loop of each cast on stitch, pick up 8 sts around the edge.Rounds 1-30: k240 (I like to count by hundreds). Close the arms by consoditating sts. You should now have 4 sts on one needle.
Arm #1: turn and purl across (this is important if you want your thumbs to be in the right place.) Cut yarn leaving enough that the sts don’t come undone, about 6 inches. Label as #1, this
will be important later.
will be important later.
Arm #2: Cut yarn leaving enough that the sts don’t come undone, about 6 inches. Label as #2, this will be important later. Transfer both to one needle as you complete them with the purl side of the final row facing you. This will be important when you attach them to the body.
Legs (make 2): With Y1 CO 18 sts. Do not turn you’ll be knitting in the round by working from the first st you casted on.
Rounds 1-4: Knit all sts
(Leg #1: Skip ahead to Short Row Heel)
(Leg #2: knit 9 more stitches before continuing)
Short Row Heel work short rows back and forth on only 9 sts
Row 1: k9, turn,
Row 2: p7, turn,
Row 3: k6, turn,
Row 4: p5, turn,
Row 5: k4, turn,
Row 6: p3, p enc, turn,
Row 7: k4, k enc, turn,
Row 8: p5, p enc, turn,
Row 9: k6, k enc, turn,
Row 10: p7, p enc, turn one last time
Row 11:(Leg #1 sl1, k17)
(Leg #2: sl1, k8) you should now be at the start of each round again & will resume knitting in the round.

Rounds 5-8: k72 sts or 4 rounds (whichever you find easier). Now you are ready to start the toes.
Toe #1 Round 1: k3 stitches, slip next 12 sts onto a piece of scrap yarn for later, k3

Rounds 2-5: knit all sts
Round 6: The next step doubles your sts. KFB in each st until you have 12 sts
Round 7: knit all sts
Round 8: KFB in each st again until you have 24 sts
Round 9: knit all sts
Round 10: (k2tog tbl) x 12 leaving you with 12 sts (you can k2tog normally if
you choose, I just find it easier to k2tog tbl here). Cut yarn leaving a 6-inch tail. Using a
tapestry needle, slip each st onto the tail. Pull tight and thread it through all sts
a couple more times pulling tight each time to be sure to close the hole. Rather than
tying off, thread it down through the bulb, down through the shaft, out the other end
& tie it to Y1 to begin working other toes.*
Toe #2: You have 12 sts on scrap yarn, place the first 3 sts & the last 3 sts on your
needles. You should have 6 sts to work with and 6 sts on the scrap yarn.
Rounds 1-7: knit all sts.
.JPG)
Complete the bulb shaping of the toe by repeating from * to *.
Toe #3: You should have 6 sts on scrap yarn. Place them onto your needles and begin
Rounds 1-5: knit all sts.
Rounds 1-5: knit all sts.
.JPG)
Complete the bulb shaping of the toe by repeating from * to *. .JPG)
.JPG)
Legs
Rounds 1-50: k900 (I like to count by hundreds), close each leg consolidating your sts. You should now have all sts on one needle,
(Leg #1: turn, purl all sts, turn again & knit all sts) Label as #1
Rounds 1-50: k900 (I like to count by hundreds), close each leg consolidating your sts. You should now have all sts on one needle,
(Leg #1: turn, purl all sts, turn again & knit all sts) Label as #1
(Leg #2: turn & purl all sts) Label as #2
Cut yarn leaving enough that the sts don’t come undone (approximately 6 inches). Transfer both legs to one needle as you complete them with the purl side of the final row facing you. This will be important when you attach them to the body. Be sure all pieces have purl side of final rows facing toward you before arranging all parts on one needle from Right to left as follows…
Arm #1, Arm #2, Leg #1, Leg #2
Arm #1, Arm #2, Leg #1, Leg #2
Head:
With Y2 and using the Turkish Cast On Method, CO 36 sts (18 wraps) Don’t forget to purl a row. *The slip-knot does not count as one of the sts. Work short rows across 2 DPNs with only 18 sts. Row 1: sl1, k16,(1 st rem unwd) turn,
Row 2: sl1, p15,(1 st rem unwkd) turn,
Row 3: sl1, k14,(2 sts rem unwkd) turn,
Row 4: sl1, p13,(2 sts rem unwkd) turn,
Row 5: sl1, k12,(3 sts rem unwkd) turn,
Row 6: sl1, p11,(3 sts rem unwkd) turn,
Row 7: sl1, k10,(4 sts rem unwkd) turn,
Row 8: sl1, p9,(4 sts rem unwkd), turn,
Row 9: sl1, k8,(5 sts rem unwkd), turn,
Row 10: sl1, p7, p enc, turn. (4 sts rem unwkd)
Row 11: sl 1, k7, k enc twice. turn. (4 sts rem unwkd)
Row 12: sl 1, p9, p enc, turn. (3 sts rem unwkd)
Row 13: sl 1, k10, k enc, turn. (3 sts rem unwkd)
Row 14: sl 1, p11, p enc, turn. (2 sts rem unwkd)
Row 16: sl 1, p13, p enc, turn. (1 st rem unwkd)
Row 17: sl 1, k14, k enc, turn. (1 st rem unwkd)
Row 18: sl 1, purl all rem sts, do not p enc, turn.
Row 19: sl 1, knit all rem sts, do not k enc, do not turn

Now is a good time to remove the slip knot that you started with. Being working in the round by knitting the 18 sts that were formed during your cast on. Be sure you are looking at the knit side of your work before you complete this step. Also make sure you are not using the yarn tail for your working yarn. You can move the yarn tail to the front of your work to mark the beginning of each round. (if for some reason you only have 17, don’t worry, you can just increase by one after 9 sts.) Rounds 1 & 2: knit all 36 sts.

Cut yarn leaving enough to tie Y1 onto, and begin short rows again.

Cut yarn leaving enough to tie Y1 onto, and begin short rows again.
Snout:
*you’ll work short rows again here*
Row 1: k2, KFB 14 times, k2 (32 sts), turn,
Row 2: sl1, p30, (1 st rem unwkd) turn,
Row 3: sl1, k29, (1 st rem unwkd) turn
Row 4: sl1, p28, (2 sts rem unwkd) turn
Row 5: sl1, k27, (2 sts rem unwkd) turn
Row 6: sl1, p26, turn, (3 sts rem unwkd)
Row 7: sl1, k25, turn (3 sts rem unwkd
Row 8: sl1, p24, turn (4 sts rem unwkd)
Row 9: sl1, k10, KFB twice, k11, turn, (4 sts rem unwkd)
Row 10: sl1, p24, turn (5 sts rem unwkd)
Row 11: repeat row 9 (5 sts rem unwkd)
Row 12: repeat row 10 (6 sts rem unwkd)
Row 13: repeat row 9 (6 sts rem unwkd)
Row 14: repeat row 10 (7 sts rem unwkd)
Row 15: repeat row 9 (7 sts rem unwkd)
Row 16: sl1, p24, p enc, turn (7 sts rem unwkd)
Row 17: sl1, k10, k2tog, k2tog tbl, k10, k enc twice, turn, (6 sts rem unwkd)
Row 18: repeat row 16 (6 sts rem unwkd)
Row 19: sl1, k10, k2tog, k2tog tbl, k11, k enc, turn, (5 sts rem unwkd)
Row 20: repeat row 16 (5 sts rem unwkd)
Row 21: repeat row 19 (4 sts rem unwkd)
Row 22: repeat row 16 (4 sts rem unwkd)
Row 23 repeat row 16 (3 sts rem unwkd
Row 24: repeat row 16 (3 sts rem unwkd)
Row 25: sl1, k25, k enc, turn, (2 sts rem unwkd
Row 26: sl1, p26, p enc, turn, (2 sts rem unwkd
Row 27: sl1, k27, k enc, turn, (1 st rem unwkd)
Row 28: sl1, p28, p enc, turn, (1 st rem unwkd)
Row 29: sl1, k29, k enc, turn.
Row 30: sl1, p30, p enc, turn,
Row 31: sl1, k1, k2tog 14 times, k2, do not turn, end short rows & you should have 36 sts again.
Switch to Y2 & k9. You are now ready to resume knitting in the round to complete the rest of the body.


Head continued:
Round 5: knit all sts
Round 6: k14, k2tog twice, k2tog tbl twice, k14 (32 sts)
Round 7: knit all sts
Round 8: k10, k2tog three times, k2tog tbl three tmes, k8 (26 sts)
Round 9: knit all sts
Round 10: k6, k2tog, k3, k2tog, k2tog tbl, k3, k2tog tbl, k6 (22 sts)
Round 11: knit all sts
Round 12: (k2, k2tog) twice, k6, (k2tog tbl) twice (18 sts)
Round 13: knit all sts
Body Section:
Round 14: k6, KFB, k4, KFB, k6 (20 sts)
Round 15: k6, KFB, k2, KFB twice, k2, KFB, k6 (24 sts)
Round 16: k6, KFB, k10, KFB, k6 (26 sts)
Round 17: k6, KFB, k5, KFB twice, K5, KFB, k6 (30 sts).
Round 18: k7, you are now going to consolidate the next 4 sts to be worked with the 4 sts on Arm #1. While holding the body section as if you were going to continue knitting, pick up the needle containing the arms so that you can see the purl side of the final row and place it in front of your work parallel to needle & consolidate. k8, & attach Arm #2 in the same manner as the first, k7.
Round 19: knit all sts,
Round 20: k7, KFB, k14, KFB, k7 (32 sts)
Round 21: k7, KFB, k7, KFB twice, k7, KFB, k7 (36 sts)
Round 22: k8, KFB, k18, KFB, k8 (38 sts)
Round 23: k8, KFB, k9, KFB twice, k9, KFB, k8 (42 sts)
Round 24: k8, KFB, k24, KFB, k8 (46 sts)
Round 25: k9, KFB, k11, KFB twice, k11, KFB, k9 (48 sts)
Round 26: knit all sts
Round 27: (k7, KFB) x 3, (KFB, k7) x 3 (54 sts)
Round 28: knit all sts
Round 29: (k8, KFB) x 3, (KFB, k8) x 3 (60 sts)
Rounds 30-38: knit all sts,
Round 39: (k2, k2tog) twice, k4, k2tog, k32, k2tog tbl, k4, (k2tog
tbl, k2) twice, (54 sts)
Round 40: knit all sts
Round 41: k3, k2tog, k8, k2tog, k6, k2tog, k8, k2tog tbl, k6, k2tog tbl, k8, k2tog tbl, k3 (48 sts)
Round 42: k13. Now consolidate the next 9 sts to be worked with the sts on Leg #1. Remember to hold the leg so you can see the purl side of the final row. k4, & attach Leg #2 in the same manner. k13
Round 44: (k3, k2tog, k3) 6 times. (42 sts)
Round 45: k2, (k2tog, k6, k2tog, k4) twice, k2tog, k6, k2tog, k2 (36)
Round 46: (k2, k2tog, k2) 6 times, (30 sts), stuff the upper portion of the body until firm.
Round 47: k1, (k2tog, k4, k2tog, k2) twice, k2tog, k4, k2tog, k1 (24 sts)
Round 48: (k1, k2tog, k1) 6 times, (18 sts
Round 49: (k1, k2tog,) 6 times (12 sts) cut yarn leaving a 8 inch tail, & using a tapestry needle thread it through the all stitches. Stuff more fiber-fill into the body until you are satisfied with the firmness, pull tight and tie off. You’ll need to be creative with this step since it’s closed &you can’t work from the inside.
Eyes (make 2):
Using Y2, and the Turkish Cast On Method, CO 36 sts (18 wraps), Don’t forget to purl a row. *The slip-knot does not count as one of the sts. Work short rows across 2 DPNs with only 9 sts. Work from chart until all rows have been completed. You should now have 18 sts on your DPN and 18 still on the circular needle. It will be easier to stitch the eye into place if you stuff it first. Cut yarn and thread it through all the sts using your tapestry needle.

Your completed eye will look like a neat little cup. Do not pull tight. Stuff with fiber fill & then pull tight enough that you cannot see any of the yarn tail through the colored parts to hold the stuffing in.

Stitch to the head along the lines that formed when you knitted/purled each encroachment.

I like to stitch the back of the eye into place first followed by the front part. It stays in place easier this way.
Finishing: Weave in any loose ends. Embroider nostrils and a froggee smile. Chain Stitch along the lines on either side of the snout and dip slightly as you near the front
Voila!!! You now have your very first Sock Froggee!!!
 .
. You are of course free to embellish him any way you wish.